Friday, March 20, 2020

1943 Dress Reproduction and Pattern Review; Hollywood Four Star Patterns #1136

1943; Hollywood Four Star Patterns #1136; 1940's Wartime High Neck Pussy Bow Tea Frock
The Supplies:
  • 1943 Hollywood Four Star Patterns #1136, purchased from MyVintageWish on Etsy $12.19
  • 1940's 5/8" Plastic Buttons on Original Card, purchased from NevadafuffsStuff on Etsy $6.48
  • White 16" invisible zipper $0.12
  • Blue-green gingham full flat sheet, 50/50 cotton polyester; JC Penney Home Collection Smooth Touch; measuring 101x81 inches when seams ripped out and ironed $2
  • White thread
Total Cost: $20.79
NevadafuffStuff product image


The Process: 
     I bought this cotton-polyester blend full flat sheet at a local thrift store for $2 and absolutely love it. The sheet was in great condition and is quite thick and durable, perfect for a house/day dress. I'm not sure how cool it will be in the summer, but so far it's been working for spring. The pattern was relatively easy to follow for the first half and then I abandoned the written directions halfway through. Hey, progress!

     I was debating putting in pockets and had them installed at one point, but they were so infuriatingly small. 😂 

     The zipper took me about 5 times to install, the 4th time I thought I had finished but there was no bobbin thread. Whoops!

     I also debated adding the ruffles to the bodice for added interest, but I think I'd prefer to sew it up in a solid color so I can highlight those details. 

Button closeup and daisy stitch closeup
     I used the daisy stitch function on my new sewing machine that I got from my parents as a birthday gift and I think it gives it a nice subtle detail on the button band and shoulder yokes.

     Overall, it was a fairly straightforward pattern and was easy to size up to my measurements. I added an additional 2 inches to the bodice bust, 1 inch to the bodice waist, and 1/2 inch to the bodice length. I ended up adjusting the sleeve width in order to fit the arm scythe due to widening the bodice. I forgot to add the additional length to the center band but I was able to make it work thanks to have a pussy bow around the neckline hiding the dip. I did not add any extra width to the skirt pieces as I figured if I needed extra fabric to work with that I could sew a slightly smaller seam allowance for all the skirt pieces.
  
     This pattern checks off almost all the things I love in a dress, minus the missing pockets. The sleeves have great mobility, the skirt is very comfortable, and the waist has some ease.

     The only things I would change are the aforementioned pocket size, and substituting the gathered skirt front of View 1 and substituting it with View 3's skirt front that is made in 1 piece instead of 2 separate pieces as I dislike seams going down the middle of a skirt front.


Kitty bomb!


1943 Valentine Dress Reproduction and Review; McCall's M7433

McCall's M7433 Reproduction pattern of McCall 5295 from 1943; Misses' Inverted Notch-Collar Shirtdresses and Belt
 Pattern Description: Pullover dress has semi-fitted bodice, side zipper closing, skirt with front and back pleats, self-belt and contrast neckbands. View A has short sleeves with contrast band. View B has long sleeves with cuff and placket.
This is the pattern that M7433 based its reproduction pattern.


This dress took me a month with off-and-on work. I started it with the intention of finishing it in time for Valentine's Day but alas I was a couple days short of my deadline but I did finish it in February, but I've only just gotten around to writing a blog post about it. 


The Supplies:

Pattern: McCall's M7433 Size A5 (6, 8, 10, 12, 14)
Fabric: 3 yards of fabric we had bought years ago with the purpose of sewing it into a nightgown.
Buttons: 3 leftover pink modern buttons from my previous M7433 dress
Thread: White
Bias Tape: 1950's bias tape that I found at a thrift store
Zipper: Blue Invisible Zipper, 12 cents


The Process:

This is my second time sewing up this pattern and I think likely the last. I like the overall look but I'm not a fan of the neckline nor the construction; I had bought this pattern believing it was a literal reproduction of their 1940s pattern, but it's more of a modern does vintage take, which I feel is a bit of a shame and a let down. I had hoped that buying a reproduction pattern would mean I'd have the chance to learn more about vintage construction and how they achieved the desired look. Seam Racer did a great review and breakdown on how the original #5295 pattern was constructed and how it differs from the M7433 reproduction. If I were to make it again, I'd like to find an original copy of McCall's #5295 pattern.

Both times that I've made this pattern I've had to overlap the bodice front more than the pattern calls for, as I'm not a fan of plunging v-necks. The first version of this dress worked out o-k, but I still wear a camisole with it. This version is more overlapped because it visually bothered me that the plaid didn't match in the front, leaving me with either the choice to have the blue lines meet up or meet in the middle of the plaid box, if that makes sense. I like the neckline better with this one but it's created other problems such as a slightly smaller waist and pulled the shoulders forward, limiting arm mobility. It also messed up the button alignment so now the buttons are not aligned in the middle of the bodice.


This was my first time attempting the skirt as I didn't have enough fabric the first time.

The fabric was originally 3 yards but I had cut a section out of it years ago for another project (no recollection what) so it left me roughly 2.75 yards of fabric. I cut the fabric sideways along the bias as the fabric was not wide enough for a skirt panel. The two skirt panels are ridiculously large. Last time I checked fabric was rationed in 1943. Hmmm, another liberty this pattern took. I don't see many pleated skirts (still researching) from the 1940s but I'd imagine if they occurred during the 1940s that they would do so after the war in the second half of the 1940s due to fabric restrictions.


Monday, January 13, 2020

1954 Dress Reproduction and Review; Simplicity 4731

Simplicity 4731; ©1954; Misses' and Women's One-Piece Dress
 Pattern Description: A small shaped collar and cuffed sleeves style this softly tailored dress. The skirt side front has a yoke section forming a pocket. The upper edge of the pocket is shaped. The dress has a front button closing. View 1 fastens at the neck. Collar, cuffs of elbow-length sleeves and edge of skirt pocket are accented with top-stitching. View 2 is open at the neck, sleeves are short.
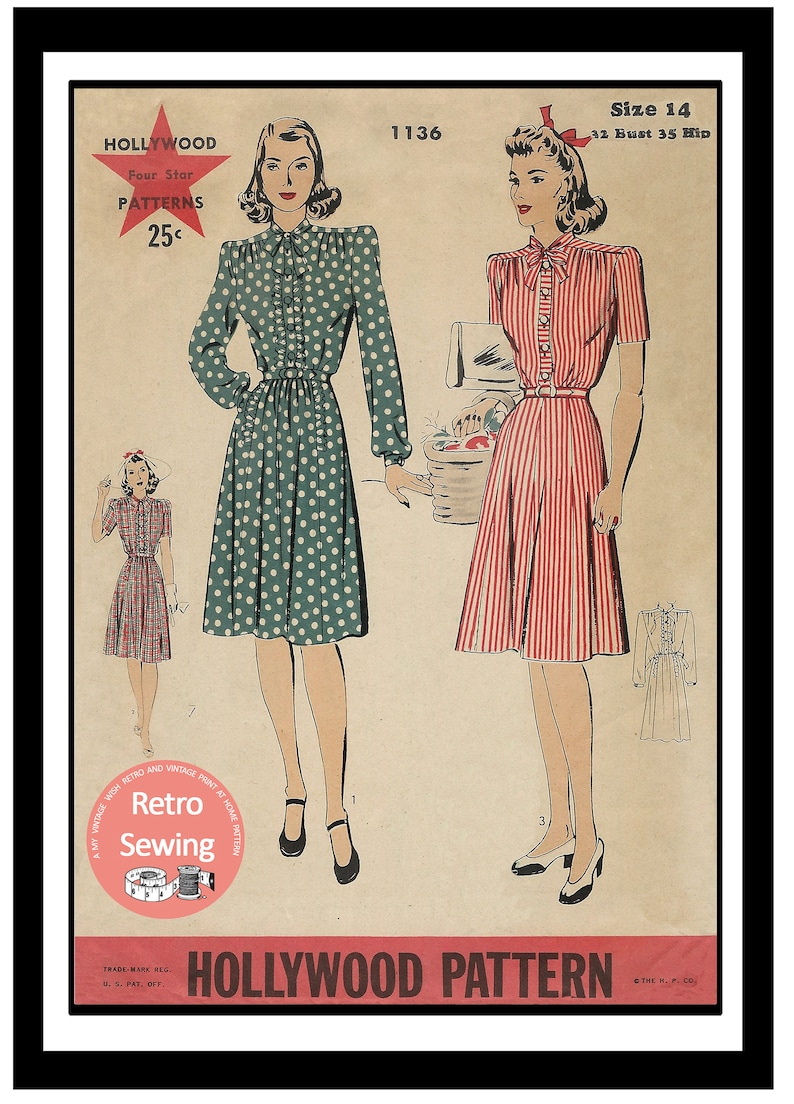
Here is a photo of the envelope that I was able to locate on Pinterest; mine, unfortunately, is long past its glory days and looks poorly.
I combined View 1 and View 2 (View 2's open neck, and View 1's long sleeves).

This dress has been 3 months in the making with on-and-off work. I was hoping to have finished this project before the end of 2019 but alas, this project had its issues.

The Supplies:
  • Pattern: Simplicity Printed Pattern 4731 Size 14 Bust 32" $0.10
  • Fabric: 3.5 yards of Keepsake Calico, Greek Isle N5420 Quilt Fabric, purchased from JoAnn's. 43" 100% cotton, machine wash cool delicate. $17.47
  • Buttons: 1960's Yellow Raindrop Buttons, 10 count, 15mm, purchased from brizelsupplies on Etsy. $10.24
  • Thread: Coat 250 yd. in brown $3.99
  • Interfacing
Total Cost: $31.80

The Process:
I purchased this vintage pattern, along with two others at the beginning of August 2019, all 3 priced at 10 cents each! Such a lucky find!

I knew going in that it would be a challenge, especially considering that it would be my first time using genuine vintage sewing patterns. It was rather exciting, not to mention nerve-wracking. The envelope was quite damaged and extremely brittle, and the pattern instructions were faded and falling apart. With this in mind, I went through the tedious process of carefully photo-copying the original instructions and tracing the original pieces onto tracing paper. If it means that this pattern and its contents can be passed on to future generations and that it lasts another 60 years, then it will have been worth it.

Because the envelope was so damaged the size listed was almost indistinguishable, but thanks to some detective work I learned it was a size 14, one size smaller than my measurements. Fair enough I thought, I can just resize the pattern, but after taking the waist measurements of the skirt pattern pieces I was convinced that it would fit. I was right...to an extent. The skirt did indeed fit. The bodice, not so much. After completing the bodice I discovered that the skirt had to be gathered to fit. Whoops! I couldn't just recut the pieces, let alone recut a single piece as I used almost every scrap of fabric. After some deliberating for several weeks, I decided to remove 2 of the 4 pleats on the front bodice, which gave me the 2 additional inches I needed. So no skirt gathering! 😀

When it came to cutting out the fabric I employed the use of pattern weights or rather varying objects (stapler, bean-filled pincushions, water spritzer, etc.) instead of sewing pins. This seemed to quicken the process, made my cuts more accurate and left less damage to the pattern paper. Definitely a technique I'll use again in the future, though perhaps with real pattern weights. I also used tailor tacks and thread tracing techniques instead of water-soluble fabric markers.


I combined View 1 and View 2 (View 2's open neck, and View 1's long sleeves).

I used almost all 250 yards of the thread I bought for this project due to testing out the functions of my new sewing machine that I received from my family from my birthday. That, and all the basting I did and redid. Whoops!

Instead of just simply lining up pattern pieces to the grain lines, I also cut out the fabric so that when assembled, the lines of polka dots would line up continuously along the skirt and bodice. The semi-striped fabric made it easier to cut out and assemble the pieces and was well worth the extra work!

The pattern instructions were very difficult for me to understand. I'm unsure whether it has to do with my knowledge, general sewing instruction confusion, or the vintage terminology. Perhaps all of the above. The instructions served little use to me and I abandoned them after the 4th step. The sewing illustrations were far easier to understand.


I even took the time to buy and put in interfacing, now that's commitment!

Thankfully I didn't have to make bound buttonholes as my new sewing machine has buttonhole capabilities. So what might have taken me 2+hours probably only took me half an hour despite all my mistakes.

The dress very much resembled a robe prior to hemming. Which might be good for a future robe, but not really what I was going for. Trimming a good 2.5" from the hem and folding the remaining 1.5" (if my memory serves me well) made it the appropriate length for a mid-calf length dress. This is where the lined up polka dots came into play again. It made it extremely easy when it came to cutting the hem and sewing those last few stitches.

The only finishing touches I still need to do is to add a snap to the waist where it tends to gap, and embroider a label with my name, the year, pattern name, and pattern #, and sew onto the bottom of the neck facing.
.
Review and Conclusion:

My only regret with this dress, or rather two was not for taking more time when it came to finishing the seam connecting the sleeve to the cuffed sleeve. Despite stitches tacking it to the inside of the sleeve, it can sometimes come untucked. The other being the neck facing. The neck facing was either not addressed in the pattern instructions or I couldn't decipher it because when worn the neck facing tends to want to stick out the top because of excess fabric. This can likely be remedied by simply placing one or two well-placed darts with the dark facing headwords.

What I love:
  • Pockets!
  • The longer sleeve option
  • A-line shape
What I hate (okay, maybe not hate):
  • The sleeve cuffs aren't my favorite as they tend to jut out; I'd likely skip this step if I made this dress again
What I would change:
  • Make deeper pockets
  • Resize the bodice waist so I can include all the pleats
  • Topstitch the collar (somehow skipped that step)


Fin! And here are some additional photos of the finished dress.


Saturday, January 11, 2020

2020 Sewing Plans

Included in my New Year's Resolutions is to sew at least 1 project a month. And hopefully, if all goes well, I'll update this post linking to each completed project throughout the year. Cheers to a new year and cheers to a new decade! The 20's have returned, let's make them roaring!


January

  • Finish Simplicity 4731 Greek Isle 1954 dress

February

  • pink and white blouse- Valentines

March

  • Subtle St. Patrick's Day 40's style blouse or dress

April

  • 1920's style pastel pink silky dress, Mrsdepew on Etsy -Easter

May

  • Heavy-duty adjustable dungarees

June

  • Navy 40s skirt

July

  • Patriotic garment, perhaps 1940s Sailor Girl Play Suit by Wearing History 

August

  • 40s combinations (panties and brassiere), Wearing History

September

  • Linden re-enactment dress or suit

October

  • Call the Midwife dress

November

  • Birthday dress

December

  • Christmas dress


Extra Sewing Ideas:
  • 50s bullet bra
  • black blouse
  • white blouse
  • black skirt
  • navy skirt
  • 40s suit set
  • black 40s trousers
  • turn 80s skirt into 50s skirt